 Supplies: Stamps: Savvy Paper: Ivory, cherry cobbler Ink: cherry cobbler Accessories: Nestabilities: scalloped and plain circles, paper piercer, Martha studded heart and border punch, satin black ribbon, dimensionals.
I don't know if there is a name for this type of card. I was thinking it would be Pop Up Tent Card? I was looking for a tutorial because I know I have seen one somewhere! Well after searching and searching, I decided to make another card and make a picture tutorial for you. If you have any questions please feel free to email me!

Start out by cutting your cardstock to 3.75x6.5. You can make your base any size you want as long as it fits in your envelope. Next, lightly draw a line at 3.5 inches. This isn’t the center because I will be adding a border punch at the bottom to make up the difference. If you do not want to add a border at the bottom, make the base longer and draw a line in the middle.

Next select the nestabilities die that you would like to pop up. This will be the largest of the frame. So if you have a focal image selected already, make sure that your image and any desired layers will fit inside this shape.
Place the A plate, B plate, paper, die facing down *lining up the center of the die with the line you drew*, C plate *the C plate should only cover the half of the die that you want cut*. The placement of the C plate is essential for the success of this card. I placed it on the shorter side of my card, lining it up with the edge of the C plate with the line previously drawn. If your sides are equal you can choose either side. In either situation you are only covering half of your die cut with the C plate so it only cuts half of the die cut.
You’ll notice in my picture that my C plate is off to the right, this placement allowed me to have more control when running it through the cuttlebug. When I ran it through the other way I had a hard time getting it to catch to run through the cuttlebug. It also didn’t leave any unwanted marks on the paper that sometimes happens when using only part of the cutting plates.
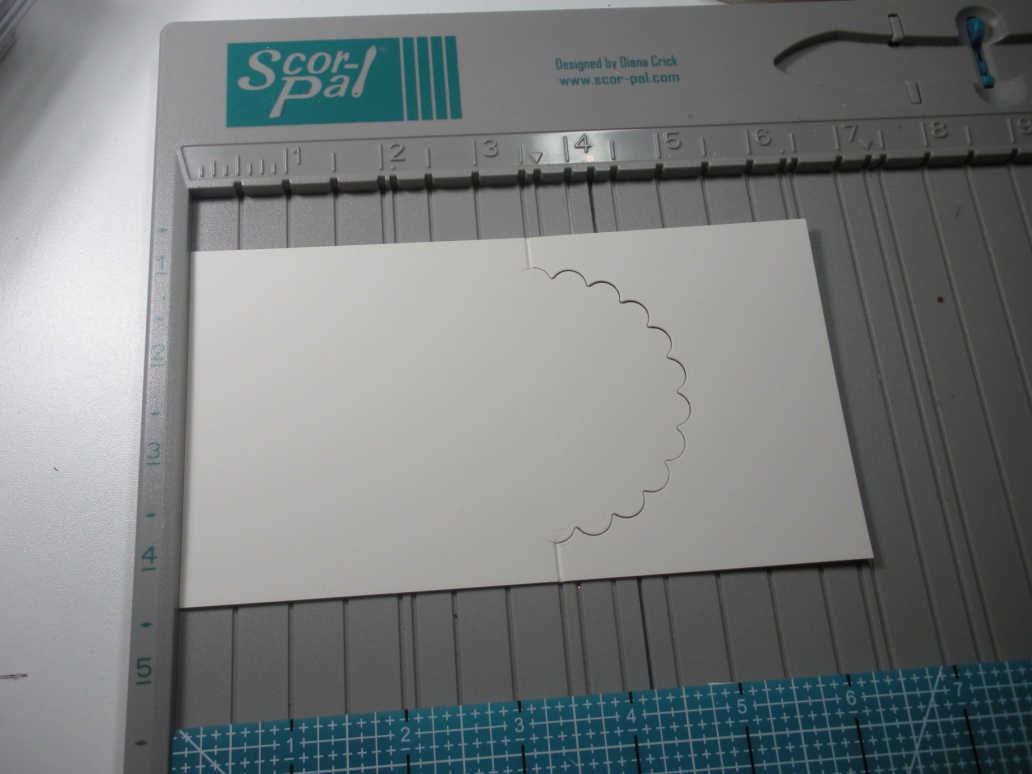
You can see that only half of the die cut was cut, and now it is time to add some score lines so you can fold the card. With the longer side of the card base on the left, line up the card base on the edge of the score-pal. Score the card edges at the 3.5 inch mark on the score-pal. If you chose a different card size simply score it in the middle.
 This is what your card will look like when it is folded. Time to embellish!
I added a scalloped circle in cherry cobbler. I punched out Martha’s studded heart punch and then cut out and embossed it using a circle nestabilities die. I popped it up on the red scalloped circle using dimensionals. I added a heart border at the bottom, added a scrunchy ribbon, stamped the sentiment, and added some piercing.

When I opened the card this is what it looked like. To make it look more polished and to hide my ribbon ends, I punched out another border lined it up with the front, and attached it.

Now it looks like this!

I hope you enjoyed this tutorial.
Have a great day!

Gorgeous card and wonderful tutorial.
ReplyDeleteVery cool card and way awesome tutorial! I had forgotten about this technique! TFS!
ReplyDeleteVery Pretty and thanks for the tutorial. TFS.
ReplyDeleteBeautiful card. Love the technique with the scallop cut out. Thanks for sharing the tutorial.
ReplyDeleteThanks so much... I learned something new todal... from Perú
ReplyDeleteGreat tutorial. Thank you.
ReplyDelete